Removing Ads From APK – 7Plus
Recently I got back to Person of Interest (PoI) TV series after remembering I haven’t finished it after maybe 7-8 years 😂 After searching a bit to see how I can stream it legally, I found out it was only available in 7plus in Australia to my surprise. 7plus is one of Australian broadcasting channels which also has the streaming rights for several overseas TV series, prison break is another. Luckily or unluckily I would say, it was free to stream PoI. You know the saying, if a product is free, you are the product, it came with unskippable video ads. Every 7-8 minutes or so I was being forced to watch 2-3 minutes ads which was causing a 40 minute show to become near an hour. That was making viewing the experience so horrible that I decided put a stop to this nonsense 😈
So I decided to dive into Android APK reverse engineering :

Let me be honest, I didn’t know much about APK reverse engineering. I had a bit of android development experience from many years ago, and I was hoping that could help. But after I checked what changed with Android development, my experience wasn’t really much helpful that I could very well start from zero. At least I saw that it was still java based so there was still hope.
I went through couple of videos and introduction articles, I started getting some ideas about the process and what I should do to remove or at least make ads skippable. Going through all the tools, how to install them, their functionalities etc would take days to write, and ain’t nobody got time for that. So here is a summary of the whole process, the steps I took to reach my end goal:
- Identify the problem, where it is coming from and find possible attack vectors.
- Use apk decompilers to get decompiled source code of the APK.
- Investigate the decompiled code, find interesting functions/classes that handles ads.
- Use FRIDA for dynamic instrumentation (always wanted to use these classy words 😎)
- Use FRIDA to override functions, change how the app behaves.
- Patch the app, compile again, sign and install the new better version
- Profit?
1. Identify the Problem
Problem is obvious, removing ads or making them skippable. But we need to dive deep into it to understand how the app works, how it serves the ads etc. This step only requires good observation and analysis skills, no need for any tool or coding. Take the app and start triggering ads, what do you see on the screen, what could you use to skip them, or what prevents you from skipping them, any text on the screen when the ads are playing, any changes to buttons etc. These are all good questions that will help you understand the app and ads, while possibly identifying attack vectors we can use.
Here two screenshots of the 7plus’s video player one with normal video and one with ads playing:
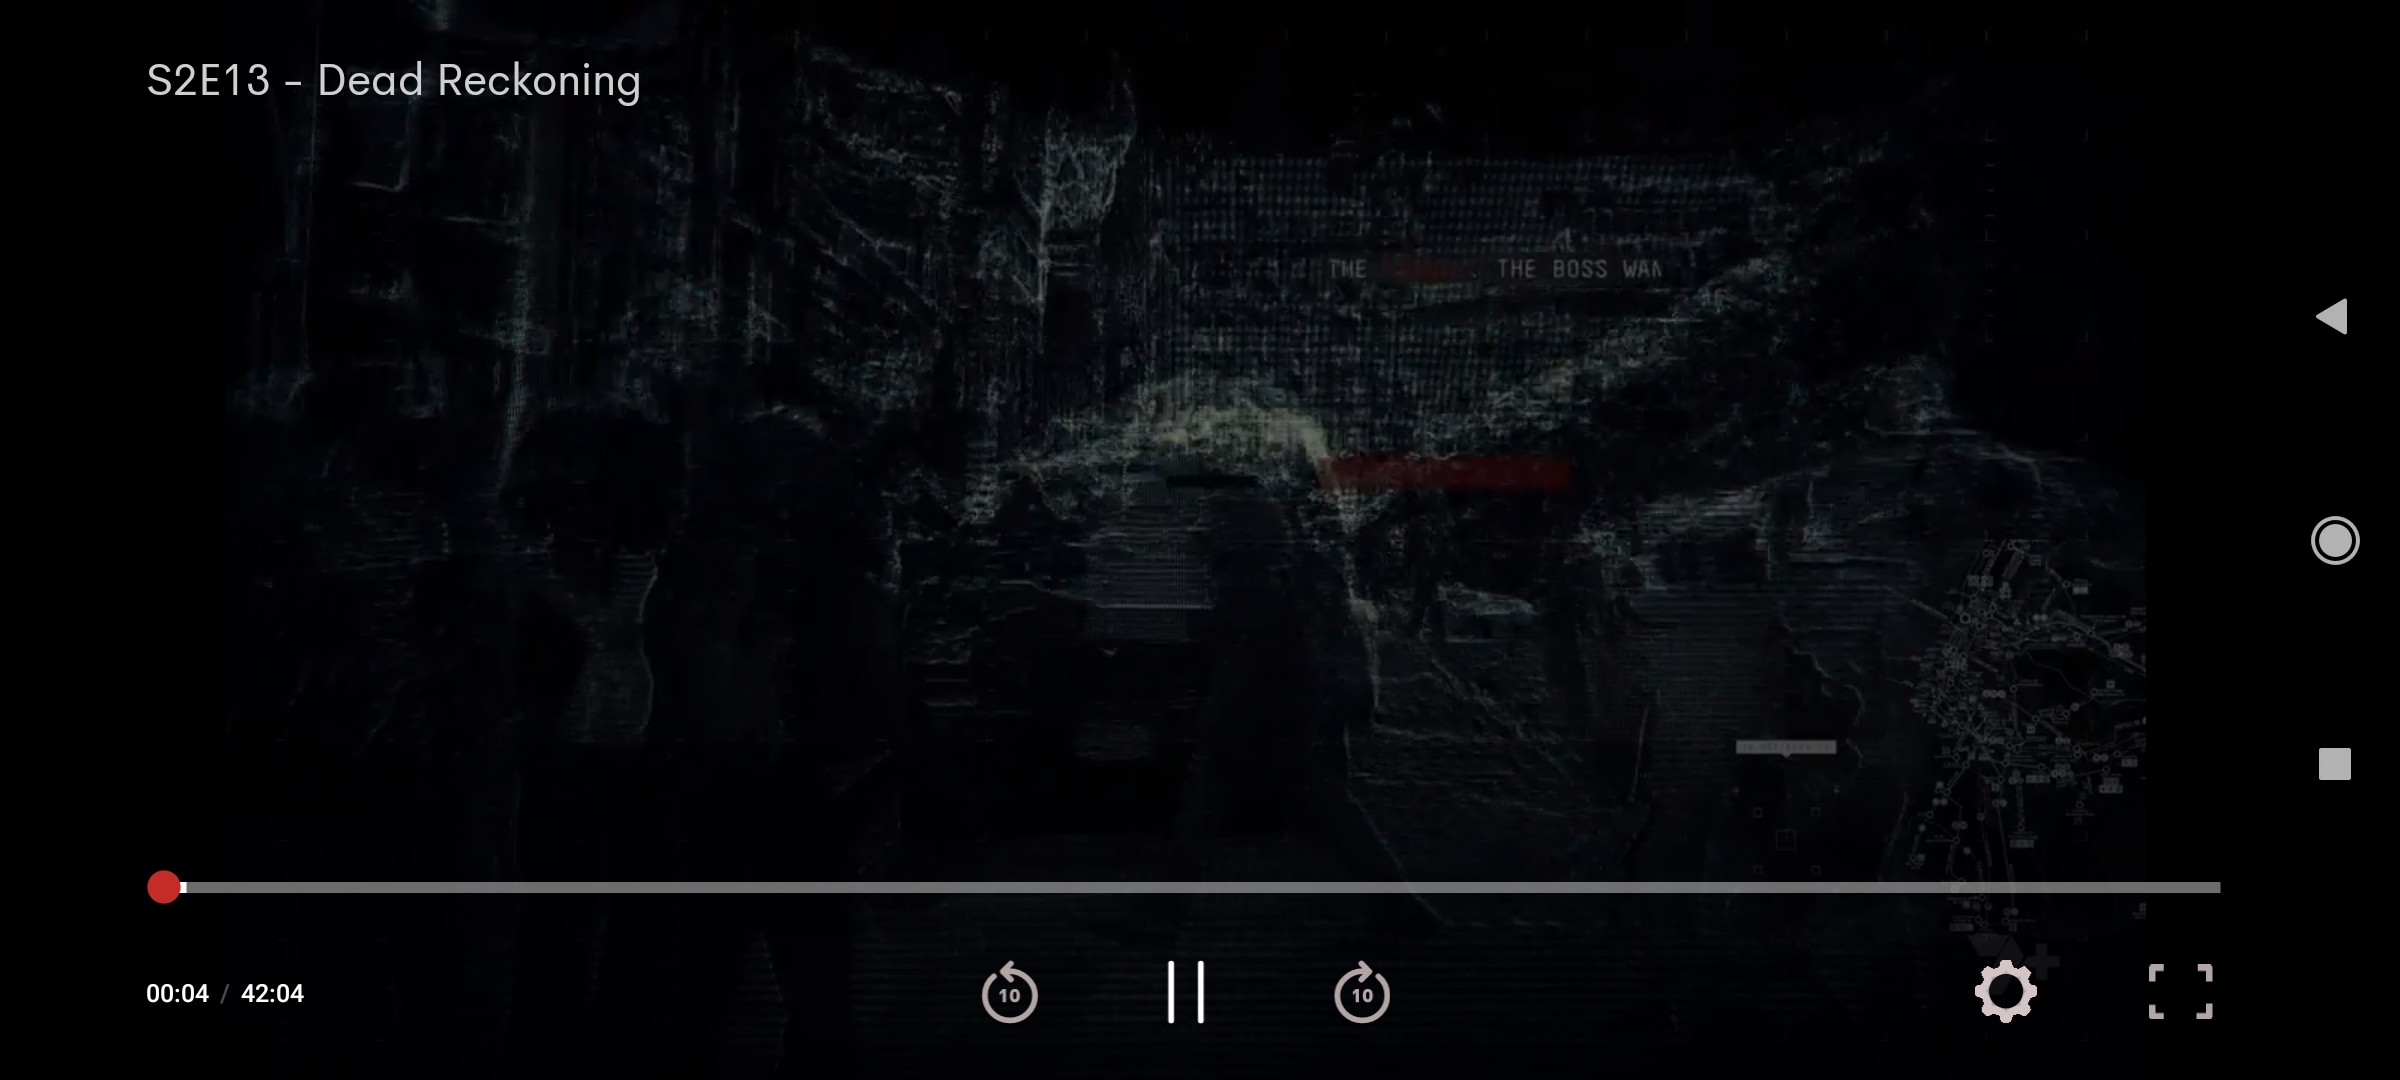
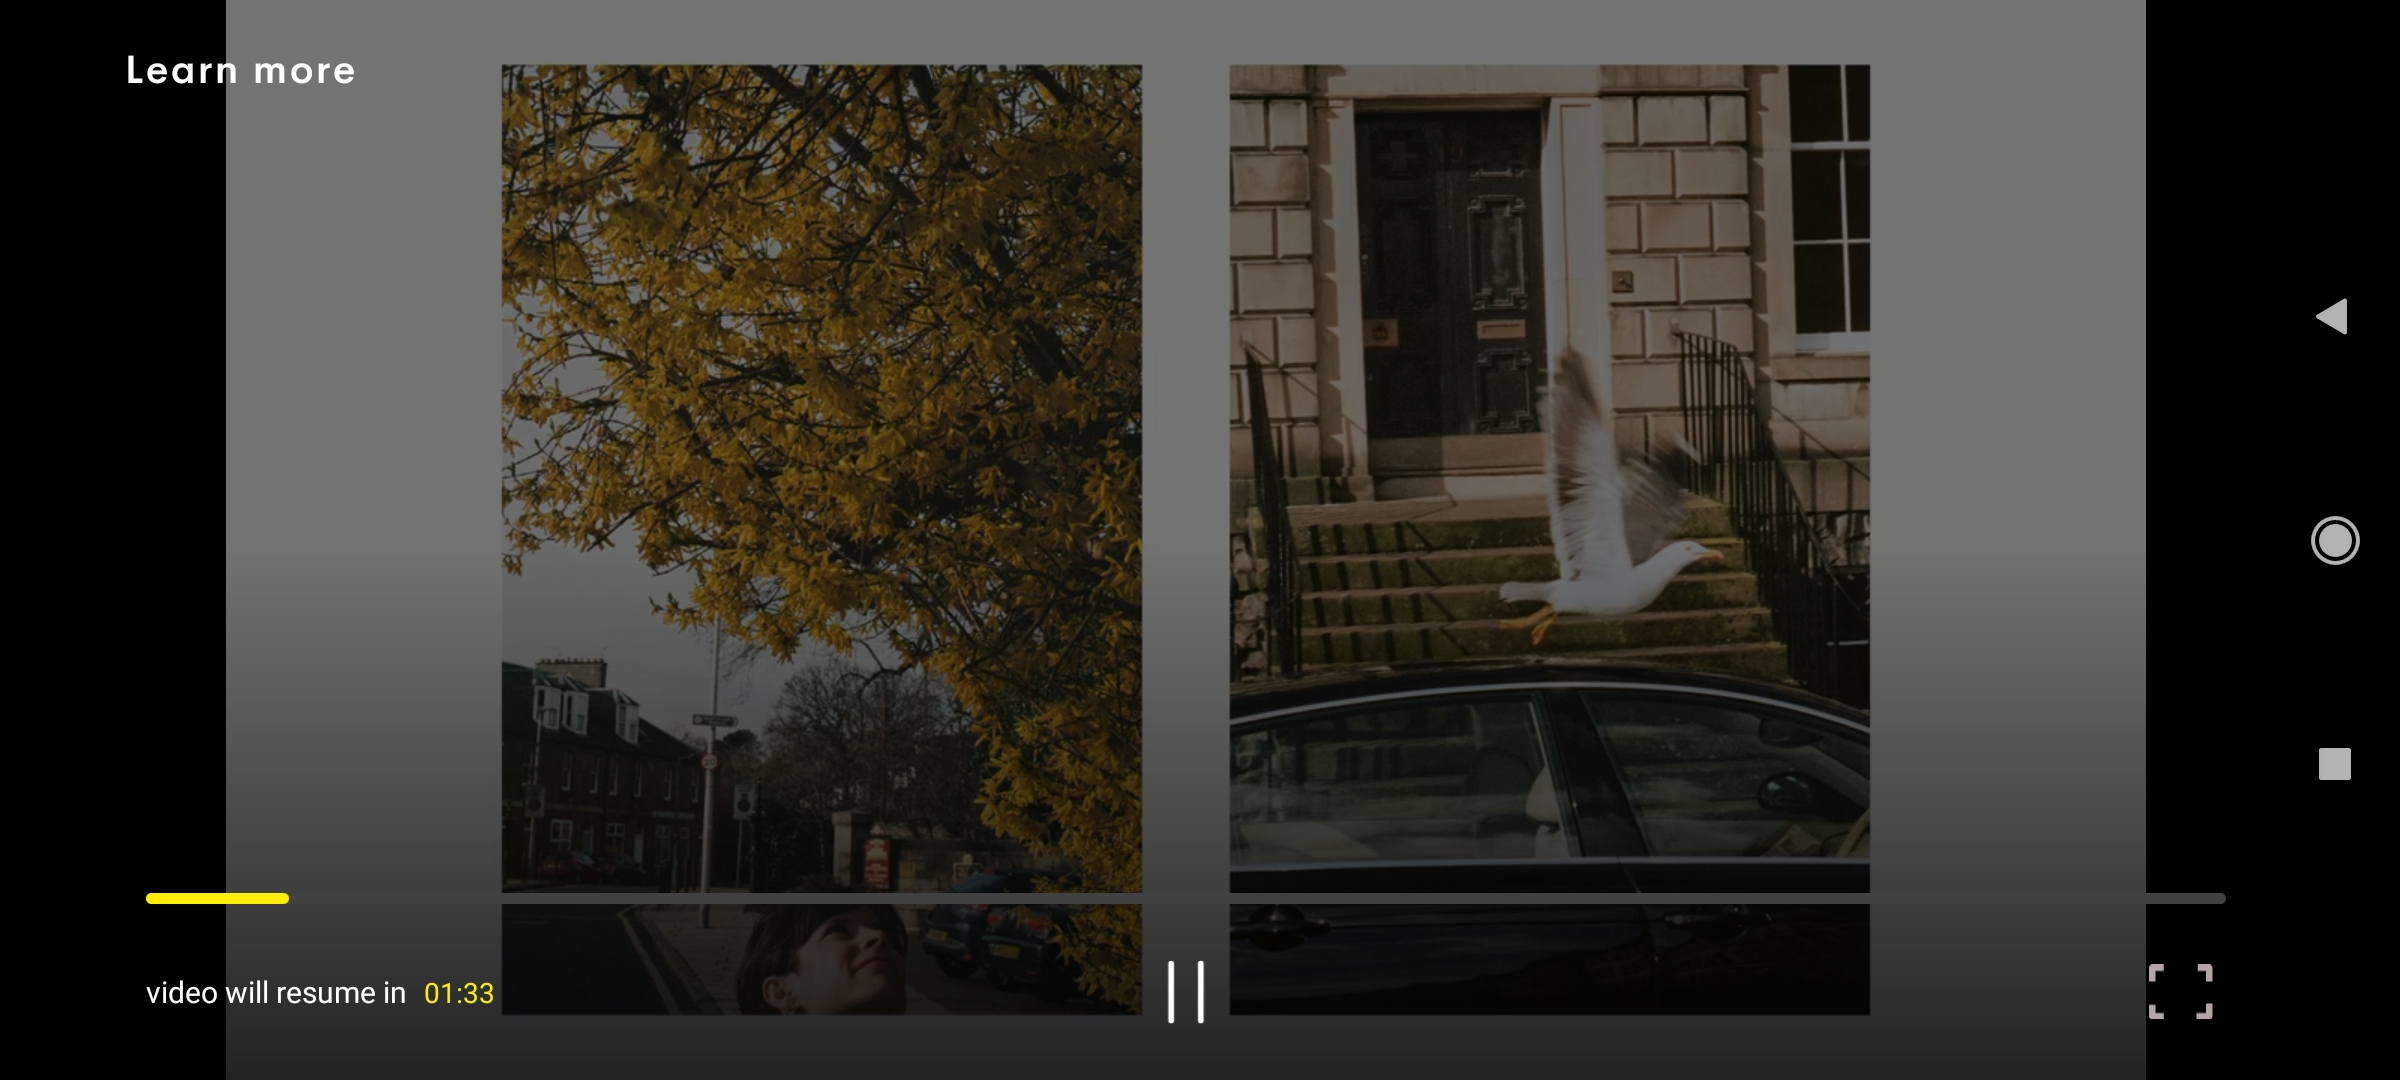
Note the UI differences between the two version. These differences help me decide on what to search for in decompiled code to find possible functions/classes. Few things I have noticed:
- Forward and reverse buttons are removed.
- Settings button is not there.
- Video player tracker becomes yellow and “deactivated” where you can’t move forward or backward.
- Ads player has a timer of total ad duration. During one ads session, it shows multiple ads and the duration shown corresponds to total of these ads’ duration.
These observations we make at this stage will help us later down the road to figure out what we can do.
2. Decompiling the APK
I didn’t really have much experience before with apk decompiling, so googling and researching brought me to a couple of options:
- JADX: Comes with an easy to use GUI. It is quite good if you are a beginner like me. Just give it an apk, and it will get you resources and decompiled java code. I initially started with this one.
- apktool: Honestly this is a great command line tool. It can do much more than decompiling. You will probably need to use this at some point of reverse engineering apks. Discussing how to use this one is another article itself.
And there are many others. These are the two I personally tried in this journey. If you have a favorite decompiler, go with it. If you are a beginner, learn at least one of these two and you are good to start doing static analysis.
Once you use JADX GUI to decompile the apk, you will see something like this:
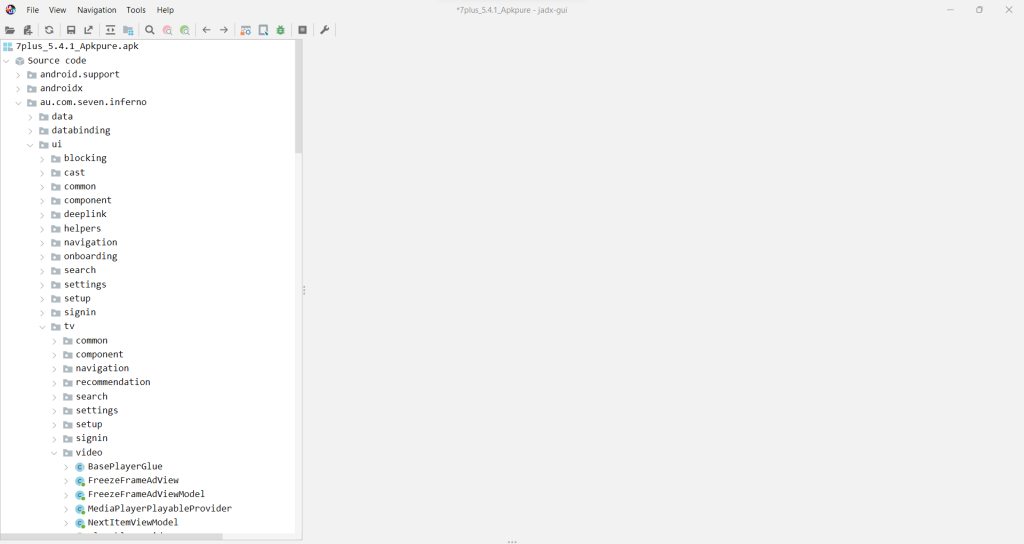
Just an example to show you classes, folders and source code hierarchy. Having some android development experience might come in handy now, this is now very close to source code of the APK. If you want you can load the folder to VS Code or some other IDE to make it easy to navigate, search and find function/class names etc. After digging through the decompiled code of the 7plus app, I have located couple of interesting classes and functions:
- au.com.seven.inferno.data.domain.model.video.playback.model.Ad
- au.com.seven.inferno.data.domain.model.video.vmap.VmapAdBreak
- au.com.seven.inferno.data.domain.model.video.vmap.Ad_VmapAdKt
- au.com.seven.inferno.data.domain.model.video.base.VideoSessionAdSource
- au.com.seven.inferno.data.domain.model.video.vmap.VmapJsonPlaybackController
And similar couple more with something related to ads. Honestly, there were a lot more similar classes. I had limited time, so I just went with first couple until I was able to reach to my goal. These are just some examples where it does something related to ad, progressing events, passing timing information, sources etc. For example in VmapJsonPlaybackController:
|
1 2 3 4 5 6 7 8 9 10 11 12 13 |
private final void handle(ProgressEvent progressEvent) { if (progressEvent instanceof ProgressEvent.AdBreakBegin) { VmapAdBreak adBreak = ((ProgressEvent.AdBreakBegin) progressEvent).getAdBreak(); sendPlaybackEvent(new VideoSessionPlaybackEvent.AdBreakReady(VideoSessionAdSource.SERVER)); sendPlaybackEvent(new VideoSessionPlaybackEvent.AdBreakStart(adBreak.getDuration())); this.adHolidayManager.startAdBreak(); } else if (progressEvent instanceof ProgressEvent.AdBegin) { Long contentTimeToSeekToAfterAdBreakEnd = getContentTimeToSeekToAfterAdBreakEnd(); Ad createWithAd = Ad_VmapAdKt.createWithAd(Ad.Companion, ((ProgressEvent.AdBegin) progressEvent).getAd(), contentTimeToSeekToAfterAdBreakEnd != null ? contentTimeToSeekToAfterAdBreakEnd.longValue() : getContentTime()); sendPlaybackEvent(new VideoSessionPlaybackEvent.AdStart(createWithAd)); this.currentSegment = new SegmentType.Ad(createWithAd); } else { if (progressEvent instanceof ProgressEvent.AdComplete) { |
This handle function looks like handling events and progresses according to the received event. One can think, if this function is taking the event and kind of starts the playback of AdBreak with sendPlaybackEvent, what if we intercept that function and make sure that the first if never checks out? So this is roughly what static analysis is looking at the code and finding interesting functions to play with.
3. FRIDA First Steps
Frida is a great dynamic instrumentation tool. I don’t have the time and experience to talk about all the details about Frida, so I am leaving it up to you to find how to perform dynamic instrumentation using Frida. But still, since I went through this process of learning to use Frida, I will at least briefly discuss what I went through and what I ended up using.
Frida in itself is a vast tool that can be used with Windows, macOS, GNU/Linux, iOS, watchOS, tvOS, Android, FreeBSD, and QNX. Yea, it is like a Swiss army knife. I have only touched it for the Android APK perspective, so whatever I write and say here is limited to my even limited experience and knowledge in that context.
So how do we use Frida? There are couple of ways of performing dynamic instrumentation (love that phrase, I will use it more and more 🤣), I will summarize the two ways I have used in the order I started learning and discovering them:
a. Frida Server
I think this is the easiest way to start playing with Frida, but it comes at a cost. You need a rooted phone or emulator. I think emulators still suck, for some reason they are always slow on my PC, and I couldn’t be bothered to find why. It was still quick and easy to test, so I went with emulator pathway 🤢🤮.
Frida server requires root account to be run in the Android. Depending on what device you are using you need to download the correct frida server version from here: https://github.com/frida/frida/releases . Once you look at the long list of different options to choose from, it might look daunting:
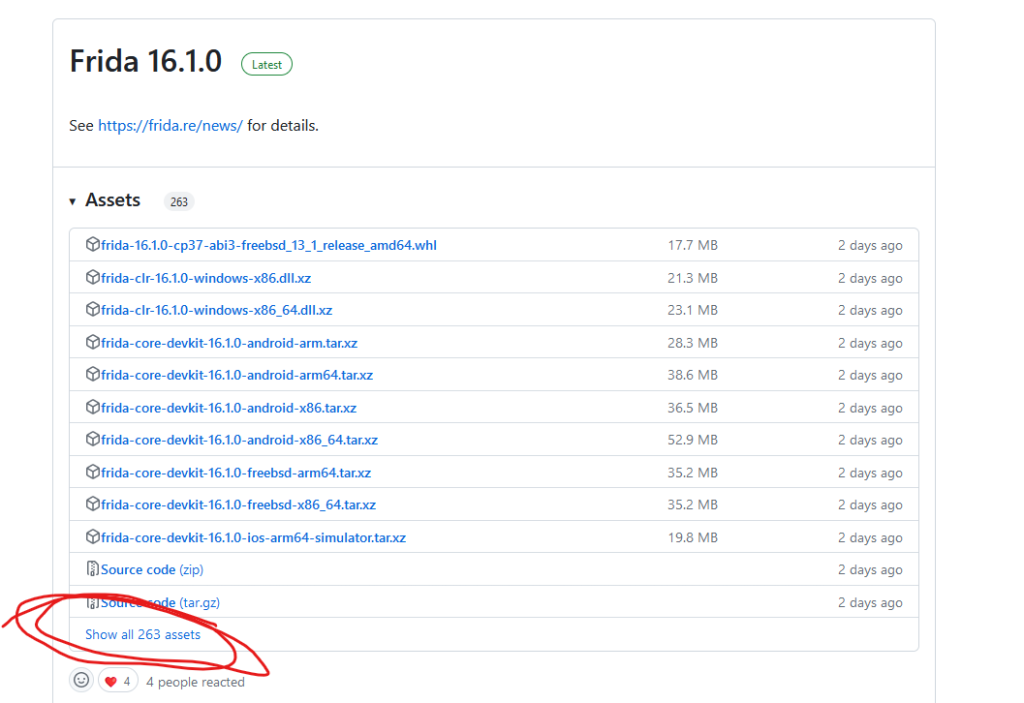
But don’t worry, it is quite simple. Releases contain various binaries, source code, dlls etc., we are only interested in frida-server for our purposes:

You can still see many options to choose here. Deciding on the version depends on where the frida-server binary will run. If you are going to inspect an Android APK, the server will run either inside an android phone or emulator. If it is going to run inside a phone, then most likely this phone will have a CPU with arm instruction set. Then you will either pick -android-arm or -android-arm64 depending on if the CPU is 32 or 64 bit. Unless the phone is an ancient model, likely it will be x64. To summarize the binary selection process:
frida-server-[VERSION]-[OS]-[PLATFORM]
VERSION: Release version
OS: Operating system of the device, in our case this is always android. We are reversing APK after all.
PLATFORM: CPU platform/instruction set of the device. Most android phones: arm64 or arm. Emulators depend on the host device’s CPU.
If you are running the emulator and not sure what platform to choose from you can run this adb command to find it:
|
1 2 |
adb shell getprop ro.product.cpu.abi x86_64 |
In my case it was x86_64, so I had to download frida-server016.1.0-android-x86_64.xz file.
Once you download the file, rest is simple:
- Unzip the file, it will contain the binary
- Transfer it to your device: adb push frida-server /data/local/tmp . This will copy the binary to /data/local/tmp folder
- Give executable permission: adb shell “chmod 777 /data/local/tmp/frida-server”
- Start the server: adb shell “/data/local/tmp/frida-server &”
On the host PC where the emulator or phone connected to, you will need frida tools to interact with the frida-server you have just run in your device. Since it is running as the root user, it will have access to many stuff in the phone, processes, files, services etc. To install frida tools:
|
1 2 3 |
pip install frida-tools frida-ps # Check if the frida is installed correctly |
Once the server starts you can run frida commands in the connected device. For the frida binaries I have played with, -U parameter makes the commands run in the USB connected device, for example the previous frida-ps was running in your host PC, frida-ps -U will run in the connected device. Frida-server is the bridge between your host pc and the connected device to run remote commands.

Once you can run frida commands on the attached device, you are ready to start dynamic instrumentation (love it).
b. Frida Gadget
What if you don’t have a rooted phone, how are you supposed to run frida server? There comes the frida gadget to your help. This awesome tool needs to be embedded inside an app which then gets loaded when the app runs. It provides the frida-server interface type of bridge between frida client and the target device. This time since it now runs in the context of the app, it can only access normal user level stuff in the android context, while still having the same access to the app’s source code hooks.
You may now ask how can we embed this inside an apk? This is a rather complicated and involved process, I am not even sure if I understood it correctly. In summary:
- Frida gadget is a dynamic library/shared object.
- Native libraries used by the app are also .so files
- Linux ELF structure can be utilized to get our gadget object loaded along with the native object.
- Update library files of decompiled app, recompile it with the patched library file. Sign and install.
- Once the app runs and the patched native library is loaded, our gadget library will get loaded.
I have tried this method but failed to get it running and connecting the client. These two links are great if you want to learn and try this approach:
- https://lief-project.github.io/doc/latest/tutorials/09_frida_lief.html
- https://fadeevab.com/frida-gadget-injection-on-android-no-root-2-methods/
After searching for a bit I cam across Objection , another great tool. It helps automate this process for you with a couple of command line calls. This tool makes patching the apk with your frida hooks very easy as well. Once you finalize the script, frida gadget can be customized to run your script when it is loaded so that you don’t have to manually run your script from command line. More information can be found here:
This step is kind of the last step of this whole process where you will need to patch the apk with gadget along with your script, so we can now move to frida scripts.
4. Frida Scripts
Frida gives you the options of writing javascript or typescript scripts to change the behavior of functions. Remember the functions we have identified in the first steps? That is right, we will now change how these functions work by overloading these functions and doing whatever we want. I am not going into too much details of how this process work internally, but rather I will focus on what I have tested and what was the outcome of my tests. To be able to run the scripts:
|
1 |
frida -U -l .\my_script.js -N PACKAGE_NAME |
PACKAGE_NAME needs to be replaced with the package name of the app which you can see in frida-ps calls. In my case it was com.swm.live for the 7plus apk.
a. Patching AdOverlayViewAdProgressInfo
In the ad player, at the bottom left there is a progress tracker bar with a timer at the bottom:

Progress bar’s value is accessed in the source code as such:
|
1 2 3 |
public final long getProgress() { return this.progress; } |
My idea was to overload this to return zero or hundred or some other value. If the progress was hundred , maybe it would just finish, my first frida javascript script:
|
1 2 3 4 5 6 7 8 9 10 11 12 |
console.log("Starting....") Java.perform(function () { var p_info = Java.use('au.com.seven.inferno.ui.common.video.overlay.ad.AdOverlayViewAdProgressInfo') p_info.getProgress.implementation = function () { console.log("GOT YOU!!!!!"); return 100; }; }); |
Just a note before moving further, console logs are quite helpful for printing parameters, values etc. You will see them on the console running the frida script.
If you managed to run the script correctly, you should see something similar to this:

That means running the script was successful, but that doesn’t mean it will do what you want. Now we will need to trigger the function we just overloaded. This can be done by triggering a video ad by starting any video which will show the progress which should call our overloaded function. Returning 0: (sorry for flickers, emulator sucks 😢 )
Returning 100 had a similar effect where the progress bar stayed fixed at a certain percentage, and timer was stuck on one value, but the ads continued playing.
RESULT: Fail! It looks like progress bar and timer was just a visual information display, they didn’t have control over the status of the ads.
b. Overload Content Duration
Ad model source code contains two functions that might related to the duration of the ad:
|
1 2 3 4 5 6 7 8 9 |
public final Long getActualContentTime() { return this.actualContentTime; } } public final long getDuration() { return this.duration; } |
My idea for this was to overload these functions and return 0 and hope that the ad wouldn’t start:
|
1 2 3 4 5 6 7 8 9 10 11 12 13 14 15 16 17 18 19 |
console.log("Starting....") Java.perform(function () { var ad = Java.use('au.com.seven.inferno.data.domain.model.video.playback.model.Ad') ad.getDuration.implementation = function () { console.log("GOT YOU222!!!!!"); return 0; }; ad.getActualContentTime.implementation = function () { console.log("GOT YOU333!!!!!"); return 0; }; }); |
I was very hopeful for this solution, but it didn’t work. For some reason, I got a run time error for the second function:

I couldn’t figure out why I was getting this error, so just gave up and moved to another solution. Maybe I should have dug deeper.
c. Working Solution
Actually I tried few other different functions, but this post is already quite long, so I will just move to my final working solution. This was a rather weird and lucky find for me. Remember how there was two different player UI for live and ads streaming, my assumption was that other buttons was hidden when the ad was playing and would show up again once it finishes. But after looking at the code, I found out they are two separate classes, one of them adds and uses all buttons while the ad player only adds the play/stop button and full screen button. And then I found this function in au.com.seven.inferno.data.domain.model.video.vmap.VmapAdBreak:
|
1 2 3 4 5 6 7 8 9 10 |
private final VmapAd adThatContains(long j) { for (VmapAd vmapAd : this.ads) { if (vmapAd.getContentAdTime() <= j) { if (vmapAd.getDuration() + vmapAd.getContentAdTime() > j) { return vmapAd; } } } return null; } |
It looks like it goes through an array of ads and checks if their time is suitable for the requested time, and then returns the ad. What if we returned null always, instead of returning an ad:
|
1 2 3 4 5 6 7 8 9 10 11 12 13 |
console.log("Starting....") Java.perform(function () { var adbreak = Java.use('au.com.seven.inferno.data.domain.model.video.vmap.VmapAdBreak'); adbreak.adThatContains.implementation = function (arg1) { // console.log("adThatContains is called" + arg1); return null; }; }); |
This would return no ads to anyone who called this function. And then this happened:

Ad was still playing, but this time I had the main player UI instead of the ad player UI. And after pressing the forward button, what I got was the actual playing, ad was gone. That was the solution I needed, ads have become skippable!
This was a near perfect solution for me that I didn’t continue investigating other solutions. But it still has some limitations:
- When the video first starts, there is always a short 30-40 seconds ads shown. In that ad, I am still getting the main player UI but this time there are no buttons, UI is not initialized yet. So since no buttons are there, I can’t skip the initial ad, but every other ad that comes after this, I was able to skip.
- Since we use the forward button t skip, main video gets forwarded by 10 seconds. It is not really a big deal breaker for me since I am fast forwarding a lot anyway.
5. Patching the Solution
Now we have a hooking script, we just need to patch the apk. I mentioned briefly about this, we need Frida Gadget to be able to run this solution in non-rooted phones. Use Objection to patch the app with Gadget with the configuration file set to load this solution script:
|
1 |
objection patchapk -s .\7plus_5.4.1_Apkpure.apk -c config.json -l solution_script.js |
And the configuration script is:
|
1 2 3 4 5 6 |
{ "interaction": { "type": "script", "path": "libfrida-gadget.script.so" } } |
This should do all the steps required to patch the apk: decompile, copy gadget .so and configuration .so, copy the script, recompile, sign etc. Then you just need to install the new APK with adb:
adb install -r .\7plus_5.4.1_Apkpure.objection.apk
This has been a much longer post than I had anticipated, I am glad I managed to get to the end of this problem and to the end of this post finally. If someone manages to read until here, you must be really bored 🤣 Seriously thank you for taking the time to read until the end. And as always, keep learning!
Woww mate you made my day!
Great work. I am going to have a crack (no pun intended) at this.